10. Donate
10.1 Individual Donations
The Protocol Guild’s funding mechanism was designed to remove all friction associated with supporting Ethereum’s core protocol development, by providing a single onchain address which vests funds to all active core protocol contributors over time. Anyone can donate ETH and ERC-20 tokens to the following address:
theprotocolguild.eth
0xF29Ff96aaEa6C9A1fBa851f74737f3c069d4f1a9

Funds sent to the above address will be held in the Guild’s Vesting contract, which vests funds over 1 year (during the pilot), before being moved to the Guild’s Split contract, for distribution to members. You can read more about the Protocol Guild’s smart contract architecture here.
10.2 Donate a Portion of Staking Rewards
If you complete this guide, join the Protocol Guild Discord and share your Split contract to get a special “Sponsor” role! 👑
The Protocol Guild joined EthStaker for a community call in December, to talk about how the Guild has created a mechanism which enables Ethereum’s ecosystem and community to help fund core protocol development in an efficient and sustainable way.
Below we will detail how stakers can take part in this public goods funding experiment, by using onchain smart contracts to trustlessly route a portion of staking rewards (specifically execution rewards) to the Guild.
This guide will describe how stakers can use 0xSplits to create a so-called “Split contract”, which is “an open-source, audited, non-upgradeable set of contracts that efficiently split onchain income”. The address of this Split contract will then be used as the “fee recipient” for receiving the staker’s execution rewards, to split rewards between the staker and the Guild. The percent allocation of the split will be determined by the staker, who can also modify it at any time. 0xSplits has been a crucial component of the Guild’s smart contract architecture, and has been used to manage $10m of funds donated to Ethereum’s core protocol contributors.
There are three steps to this guide, which shouldn’t take more than 30 mins to complete:
Note: Completing this guide will ONLY share execution rewards (block proposal tips or MEV) with the Guild, full and partial withdrawals will NOT be shared.
This is assured because only the “fee recipient” income will be shared with the Guild, which is used for execution rewards, and nothing else. The “fee recipient” is completely separate from the “withdrawal credential”, which is used to receive full and partial withdrawals.
When withdrawals are enabled later this year (after the Shanghai/Capella upgrade), all stakers will be able to set a “withdrawal credential” for full and partial withdrawals (if they haven’t already). As a reminder, a full withdrawal involves exiting a validator and retrieving all staked funds, while partial withdrawals will happen automatically to retrieve all consensus rewards (related to attestations, proposals and sync committees).
As long as stakers do not use their Split contract address as the withdrawal credential, full and partial withdrawals will not be shared with the Guild. If a staker accidentally sets their Split contract address as the withdrawal credential, the staker can still amend their Split contract to share 0% with the Guild (so the staker keeps 100% of any withdrawn funds).
If you want to learn more about how withdrawals will work, please see PEEPanEIP #94: Staked ETH Withdrawal (Testing) with Potuz & Hsiao-Wei Wang.
1. Create Split Contract
Creating a Split contract requires ETH for gas, and you will have to use Ethereum mainnet. If gas is around 15 Gwei, creating the Split contract will cost ~$2.30. At 40 Gwei it’ll cost ~$6. If gas fees are too high, consider waiting until they’re lower (e.g. over the weekend).
Ready? Let’s go!
Open the 0xSplits app in your browser and connect your Ethereum wallet. (Stay on the default “Ethereum” network.)
The address you connect will ultimately be used to create the Split contract, and if you want, can also be used as a recipient for the Split’s funds, as well as the controller of the Split contract. During the setup process, you’ll be able to choose different recipient / controller addresses if desired. Ideally the recipient and controller address should be secured via a hardware wallet. In the following screenshots, the address 0xe686…1D91 was used as the creator, recipient and controller of the Split contract. When you go through these steps, you should use your own address(es) instead!

Once your wallet is connected, click “New contract” in the navigation bar, then click “Split”.

You will now be presented with a form with various options. We will go through all options section by section.
Select “Mutable Split” (“mutable” means changeable, which allows the Split controller to update the Split contract in the future).

Recipients: Add at least two addresses, 1) the address where you want to receive your staking rewards and 2) the Protocol Guild’s address (“theprotocolguild.eth”). Determine the percentage allocation to each, e.g. 99% to yourself and 1% to the Guild.
How much should I allocate to the Guild? According to ultrasound.money, stakers who opt in to MEV will earn ~2.3 ETH per validator per year. Of that, execution rewards account for around 43%, or 1 ETH per validator per year (0.7 ETH from tips and 0.3 ETH from MEV).
So, if you allocate 1% of your execution rewards to the Guild, that’s 0.010 ETH per validator per year. 5% would equal 0.05 ETH. Of course, the actual amount will fluctuate based on demand for Ethereum blockspace.
Any amount you donate is appreciated, and signals your support for all the work that goes into building the Ethereum protocol.

Distribution Incentive: Set to 0%.
All funds sent to a Split contract are stored in a contract account until they are distributed to the Split’s recipients. Distributions do not happen automatically, as this requires interacting with the contract, which requires gas. With 0xSplits, you can set a distribution incentive, to give a percentage cut to whoever pays the gas needed to trigger the distribution. By default this is set to 1%. If you don’t mind paying and prefer to be hands-off, you can leave this as-is. Otherwise, you can set it to 0%.

Controlling Address: Leave as-is (defaults to connected address), or choose another address that you control.
The controlling address is able to modify the Split contract after its been created, meaning it can add / remove recipients, update shares, modify the distribution incentive and even make the Split immutable (i.e. remove the controller altogether).

Once you’re ready (check everything twice, though the controller can always update everything if needed), click the “Create Split” button. You will be prompted to confirm one transaction.

Once the transaction is successful, you will be forwarded to a new page with your Split contract details. You can bookmark the URL for easy access in the future!
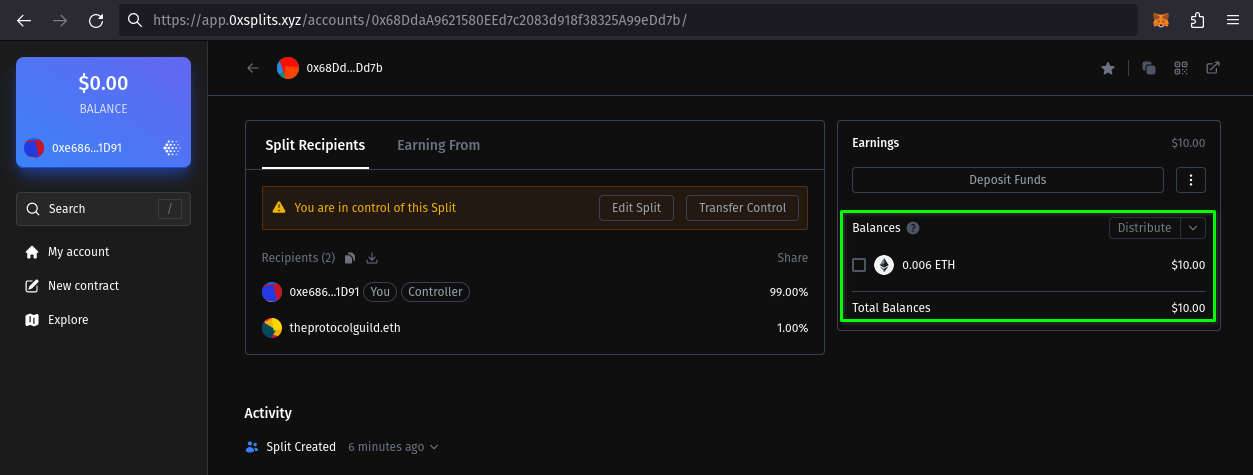
The important thing to take note of is the address that’s highlighted in green below. This is your new Split contract address, and all funds sent here will be shared among the Split’s recipients.
If you are the controller, you will also see an option to “Edit Split” or “Transfer Control” (highlighted in orange).

Congrats, you’ve set up a Split contract, and now have a new Split address! Note that this address can receive ETH and ERC-20 tokens, but cannot process NFTs (i.e. ERC-721 tokens). Any NFTs sent to this address will be lost!
With your Split address in hand, we’ll now cover the process of managing funds sent to that address.
2. Test the Split Contract Distribute Function
In this section we will go through the process of distributing the funds sent to your Split address. This section is optional, it is just meant for you to familiarize yourself with the process. You can jump to step 3 if you’d prefer.
For this example, $10 worth of ETH has been sent to a Split address. All funds will be visible in the “Balances” section of your Split contract interface.
To get these funds, 0xSplits requires you to “Distribute” the funds (among the Split’s recipients), and then “Withdraw” the funds (into your wallet). You can combine the two actions via the “Distribute & withdraw for myself” function in the “Distribute” submenu. Selecting this will prompt you to confirm a transaction (will cost around $1.10 with gas at 12 Gwei).
There’s also an option to “Distribute & withdraw for all”, which also withdraws the funds for the Protocol Guild. This uses a bit more gas than just withdrawing for yourself (around $1.30 with gas at 12 Gwei). Save yourself the gas and just withdraw for yourself!

Once that transaction has been processed, your address will receive your share of the funds (will show up under “Internal Txns” in Etherscan). The Splits contract interface will also show you the “Total Distributed”, as well as the history of distributions.

Note that any Ethereum account willing to pay the gas can “Withdraw and distribute for all”, not just the recipients / controllers of the Split.
If you’re comfortable with this process, then you can proceed with using your Split address as your new validator fee recipient!
3. Set New Fee Recipient
In preparation for the merge, all stakers should already have set a fee recipient to receive execution rewards (block proposal tips or MEV). Replacing your current fee recipient with your new Split address is relatively simple - just repeat that same process!
This shouldn’t take more than 1 minute, but if you’re worried about downtime, you can always combine it with the next time you update your consensus client.
The instructions to change the fee recipient will vary depending on which consensus client you are running; Lighthouse, Lodestar, Nimbus, Prysm or Teku. Below are instructions for each consensus client, using Somer’s guides and CoinCashew.
Lighthouse
Official Lighthouse documentation - “Suggested Fee Recipient”
Somer’s “Guide to Staking on Ethereum (Ubuntu/Lighthouse)” - “Step 12 — Configure the Validator Service”
$ sudo systemctl stop lighthousevalidator$ sudo systemctl status lighthousevalidator
Verify that Lighthouse is no longer running.
$ sudo nano /etc/systemd/system/lighthousevalidator.service
Find the “--suggested-fee-recipient” flag, and replace the existing address with your new Split contract address (don’t change anything else). Double-check the address is correct. Then press

$ sudo systemctl daemon-reload$ sudo systemctl start lighthousevalidator$ sudo journalctl -fu lighthousevalidator
Verify that Lighthouse started correctly, without errors in the logs.
$ sudo systemctl stop validator$ sudo systemctl status validator
Verify that Lighthouse is no longer running.
$ sudo nano /etc/systemd/system/validator.service
Find the “--suggested-fee-recipient” flag, and replace the existing address with your new Split contract address (don’t change anything else). Double-check the address is correct. Then press
$ sudo systemctl daemon-reload$ sudo systemctl start validator$ journalctl -fu validator
Verify that Lighthouse started correctly, without errors in the logs.
Lodestar
Official Lodestar documentation - “Configuring the fee recipient address”
$ sudo systemctl stop beacon-chain$ sudo systemctl stop validator$ sudo systemctl status beacon-chain$ sudo systemctl status validator
Verify that both instances of Lodestar are no longer running.
$ sudo nano /etc/systemd/system/beacon-chain.service
Find the “--suggestedFeeRecipient” flag, and replace the existing address with your new Split contract address (don’t change anything else). Double-check the address is correct. Then press
$ sudo nano /etc/systemd/system/validator.service
Find the “--suggestedFeeRecipient” flag, and replace the existing address with your new Split contract address (don’t change anything else). Double-check the address is correct. Then press
$ sudo systemctl daemon-reload$ sudo systemctl start beacon-chain$ sudo systemctl start validator$ journalctl -fu beacon-chain$ journalctl -fu validator
Verify that both instances of Lodestar have started correctly, without errors in the logs.
Nimbus
Official Nimbus documentation - “Set up suggested fee recipient”
Somer’s “Guide to Staking on Ethereum (Ubuntu/Nimbus)” - “Step 12 — Configure the Nimbus Service”
$ sudo systemctl stop nimbus$ sudo systemctl status nimbus
Verify that Nimbus is no longer running.
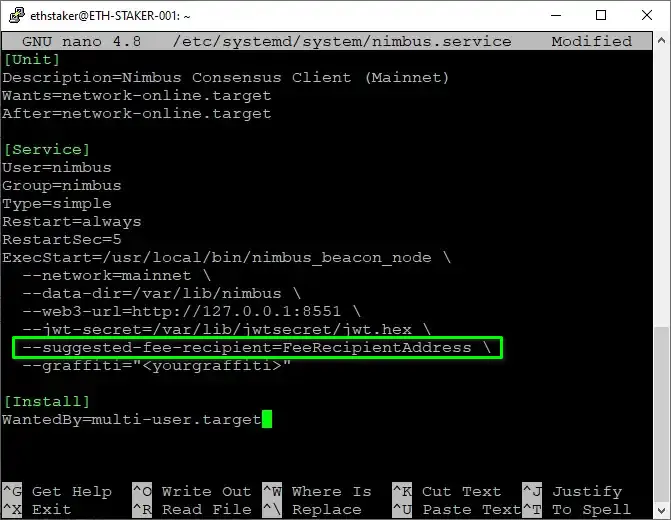
$ sudo nano /etc/systemd/system/nimbus.service
Find the “--suggested-fee-recipient” flag, and replace the existing address with your new Split contract address (don’t change anything else). Double-check the address is correct. Then press
$ sudo systemctl daemon-reload$ sudo systemctl start nimbus$ sudo journalctl -fu nimbus
Verify that Nimbus started correctly, without errors in the logs.
$ sudo systemctl stop beacon-chain$ sudo systemctl status beacon-chain
Verify that Nimbus is no longer running.
$ sudo nano /etc/systemd/system/validator.service
Find the “--suggested-fee-recipient” flag, and replace the existing address with your new Split contract address (don’t change anything else). Double-check the address is correct. Then press
$ sudo systemctl daemon-reload$ sudo systemctl start beacon-chain$ journalctl -fu beacon-chain
Verify that Nimbus started correctly, without errors in the logs.
Prysm
Official Prysm documentation - “Configure fee recipient”
Somer’s “Guide to Staking on Ethereum (Ubuntu/Prysm)” - “Step 11 — Configure the Beacon Node Service” + “Step 12 — Configure the Validator Service”
$ sudo systemctl stop prysmbeacon$ sudo systemctl stop prysmvalidator$ sudo systemctl status prysmbeacon$ sudo systemctl status prysmvalidator
Verify that both instances of Prysm are no longer running.
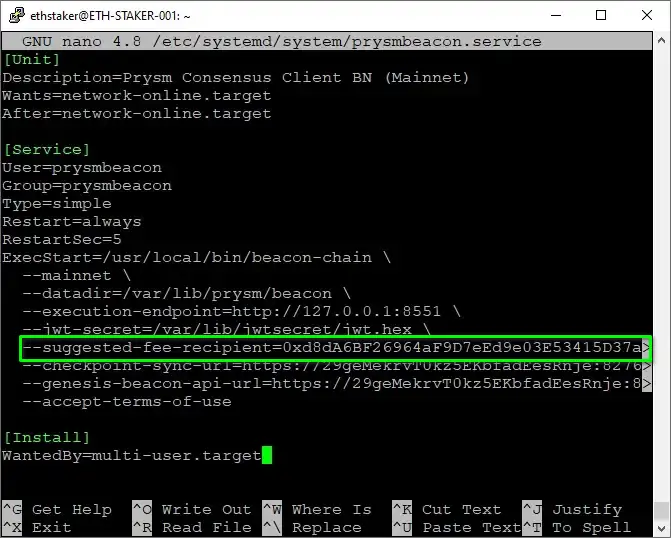
$ sudo nano /etc/systemd/system/prysmbeacon.service
Find the “--suggested-fee-recipient” flag, and replace the existing address with your new Split contract address (don’t change anything else). Double-check the address is correct. Then press
$ sudo nano /etc/systemd/system/prysmvalidator.service
Find the “--suggested-fee-recipient” flag, and replace the existing address with your new Split contract address (don’t change anything else). Double-check the address is correct. Then press

$ sudo systemctl daemon-reload$ sudo systemctl start prysmbeacon$ sudo systemctl start prysmvalidator$ sudo journalctl -fu prysmbeacon$ sudo journalctl -fu prysmvalidator
Verify that both instances of Prysm have started correctly, without errors in the logs.
$ sudo systemctl stop beacon-chain$ sudo systemctl stop validator$ sudo systemctl status beacon-chain$ sudo systemctl status validator
Verify that both instances of Prysm are no longer running.
$ sudo nano /etc/systemd/system/beacon-chain.service
Find the “--suggested-fee-recipient” flag, and replace the existing address with your new Split contract address (don’t change anything else). Double-check the address is correct. Then press
$ sudo nano /etc/systemd/system/validator.service
Find the “--suggested-fee-recipient” flag, and replace the existing address with your new Split contract address (don’t change anything else). Double-check the address is correct. Then press
$ sudo systemctl daemon-reload$ sudo systemctl start beacon-chain$ sudo systemctl start validator$ journalctl -fu beacon-chain$ journalctl -fu validator
Verify that both instances of Prysm have started correctly, without errors in the logs.
Teku
Official Teku documentation - “Configure the fee recipient”
Somer’s “Guide to Staking on Ethereum (Ubuntu/Teku)” - “Step 11 — Configure the Teku Service”
$ sudo systemctl stop teku$ sudo systemctl status teku
Verify that Teku is no longer running.
$ sudo nano /etc/systemd/system/teku.service
Find the “--validators-proposer-default-fee-recipient” flag, and replace the existing address with your new Split contract address (don’t change anything else). Double-check the address is correct. Then press
$ sudo systemctl daemon-reload$ sudo systemctl start teku$ sudo journalctl -fu teku
Verify that Teku started correctly, without errors in the logs.
$ sudo systemctl stop beacon-chain$ sudo systemctl stop validator$ sudo systemctl status beacon-chain$ sudo systemctl status validator
Verify that both instances of Teku are no longer running.
If your Teku client is configured by passing in a TOML file (i.e. teku.yaml):
$ sudo nano /etc/teku/teku.yaml
Find “validators-proposer-default-fee-recipient”, and replace the existing address with your new Split contract address (don’t change anything else). Double-check the address is correct. Then press
If your Teku client is configured by –parameters in the systemd service file:
$ sudo nano /etc/systemd/system/beacon-chain.service
Find the “--validators-proposer-default-fee-recipient” flag, and replace the existing address with your new Split contract address (don’t change anything else). Double-check the address is correct. Then press
Only if running Teku in validator in a separate client:
$ sudo nano /etc/systemd/system/validator.service
Find the “--validators-proposer-default-fee-recipient” flag, and replace the existing address with your new Split contract address (don’t change anything else). Double-check the address is correct. Then press
$ sudo systemctl daemon-reload$ sudo systemctl start beacon-chain$ sudo systemctl start validator$ journalctl -fu beacon-chain$ journalctl -fu validator
Verify that both instances of Teku have started correctly, without errors in the logs.
And that’s it! From now on, all your validator execution rewards will be sent to your Split address, which will then be shared between the addresses in your Split contract. All funds donated to the Guild will be vested to Ethereum’s active core protocol distributors over time.
Run into any issues? Hit us up on Discord!
Make sure you join the Protocol Guild Discord and share your Split contract to get a special “Sponsor” role!
Know any other stakers? Tell them about the Protocol Guild! Each additional participating validator paves the path towards the long-term health and sustainability of Ethereum’s core protocol development. THANK YOU for your support and belief in this movement. 👑
Special thanks to Alex Stokes, ladislaus.eth and the EthStaker team for reviewing this guide!